I've seen these banners all over 'blog world', so when I found out we were having Ryder's 1st Birthday at our house...I knew I wanted to make one of these!
I forgot to take a picture of the scrapbook paper before I cut it, but I got it on clearance at HB - 6 papers for $1. I got three patterns that coordinated. I didn't want baby blue...I think these colors are really cute for a boy!
I turned the papers over and found the center...then made lines to the opposite corners to make a triangle or a flag.
I just used regular scissors to cut out the 'flags'.
I have a wishblade cutter, so I used that to cut out the letters...here's try #1...for some reason, it didn't like that paper and did not cut all the way through. :-(
(I'm hoping to win one of the Silhouettes in a giveaway!!)
Here's try #2. Didn't have anymore brown paper, so switched to red...which I liked better in the end, anyways. :-)
Here is the letter 'R' on the flag...needed something.......
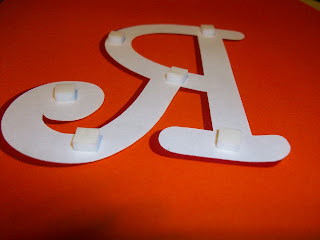
Ahhh, better! I just cut out the letters on white copy paper and then glued then onto the back of the letter...really made them stand out, don't you think?
I attached the letters to the flags with 'pop up' stickers...to add dimension.
Remember the bias tape from here?? I used it like a ribbon. I hot glued the flags on to the bias tape.
Here they all are, glued in a row...see all the clearance stickers?? Don't ya just love a sale??!!
Ta-da!!!
I was very happy with the results!! What do you think? Leave me a comment if you like or if you have suggestions on how to make it better next time!!
Supplies for banner - $2.25
Something unique for Ryder's party - Pricele$$
I party with these girls every week...click on their buttons to party with us!!


http://www.thegypsyscorner.com/


How cute! I'm hoping to win one of those silhouettes too. *crossing fingers*
ReplyDeleteThanks for your sweet comment! I love your stuff here. I'm following. :)
*SIGH* i absolutly HAVE to get one of those machines! That banner looks fabulous on your fireplace. I love the way you have all the pics lined up abovehttp://www.amaskellantics.com/ it.
ReplyDeleteI love it! I'm currently in banner making mode myself so I appreciate the extra tutorial!
ReplyDeleteAwww that is so darling. It really turned out great. Thanks for sharing!
ReplyDeleteI wish I had one of those cutters! They are so neat. Great post. :)
ReplyDeleteI love how it turned out! I am especially loving that bias tape tip. Cute! Thanks for linking up!!
ReplyDeleteVery cute, love the banner!
ReplyDelete